Easy No-Knead Everyday Artisan Bread (Perfect for Beginners)
Last updated on July 7th, 2026
This foolproof, No-Knead Everyday Artisan Bread recipe is a favourite of novice and advanced bakers alike. A yeast bread, it doesn’t require a starter and results in a golden, crisp crust and a light airy crumb. If you’re a bread beginner, this recipe is filled with information and tips to help you along the way 🍞🍞🍞
⭐️⭐️⭐️⭐️⭐️ Review:
“THIS.IS.AMAZING. Made it this morning, baked this evening and wow what an easy yet delicious recipe. Never cold proofed a yeast bread before but it’s brilliant. Thanks so much for the recipe!” –Becky
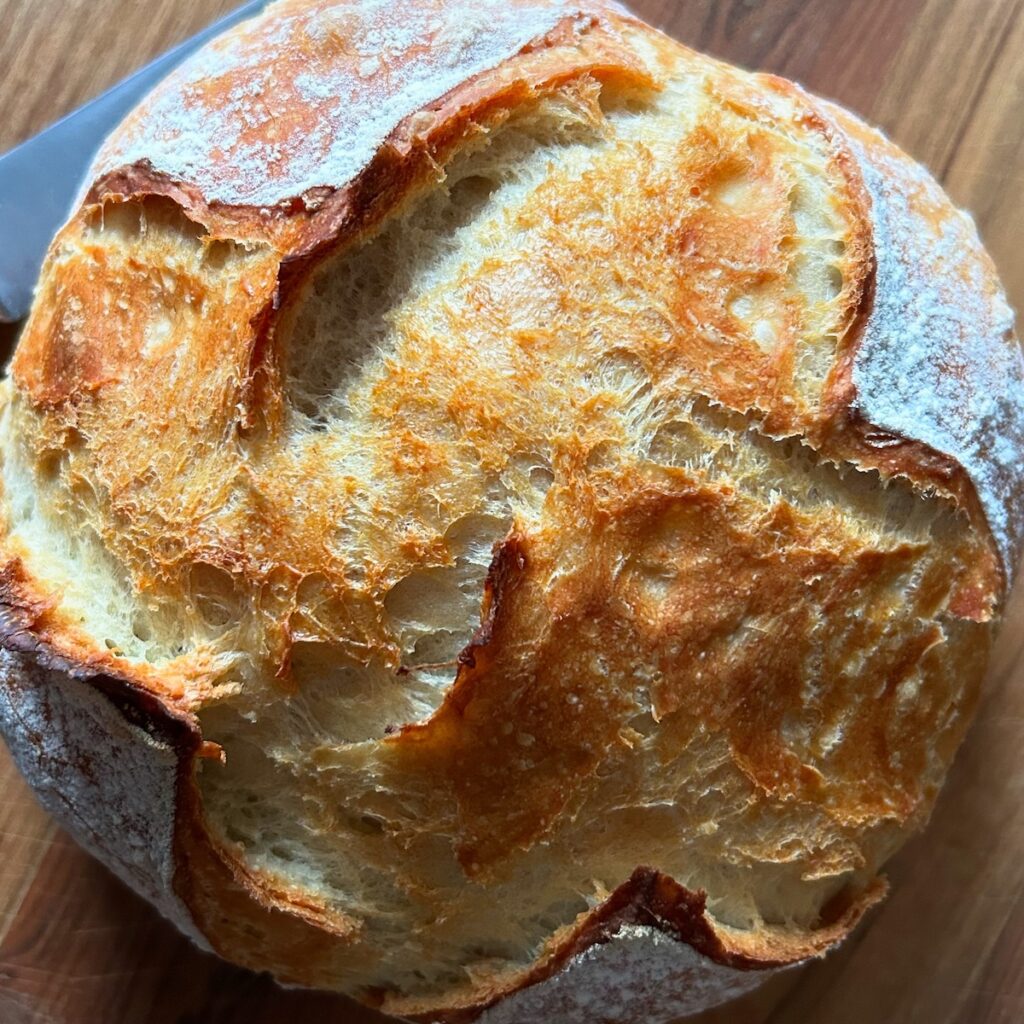
This post will show you how to make the simplest artisan bread. Made with just 4 ingredients, it requires just 20 minutes of hands-on prep time and is such a great alternative to more labour-intensive artisan bread recipes.
A simple two-day process that makes shaping and scoring super easy, too. Also super easy to fit into just about any schedule!
This beginner-friendly recipe, as well as my other artisan bread recipes, are for those either intimidated by sourdough bread making or who just want a simpler method for making delicious artisan bread at home. With minimal effort, this approach produces a rich, flavourful loaf every time.
Here’s everything you’ll need to make this Easy No-Knead Everyday Artisan Bread
- Bread or all-purpose flour
- Water
- Active dry yeast
- Kosher or fine sea salt
Ideally, you will also have:
- Digital scale
- Dough scraper
- Parchment paper
- Razor blade or very sharp knife
- Dutch oven such as this one or this one
Why Active Dry Yeast?
Unlike instant yeast which can get running too quickly, active dry yeast is the secret to building that slow, overnight flavour profile without needing a complex sourdough starter!
New to working with yeast? Reference my Baking with Active Dry Yeast guide for answers to common FAQ’s.
You can read more about why you will achieve your best results using a Dutch oven here.
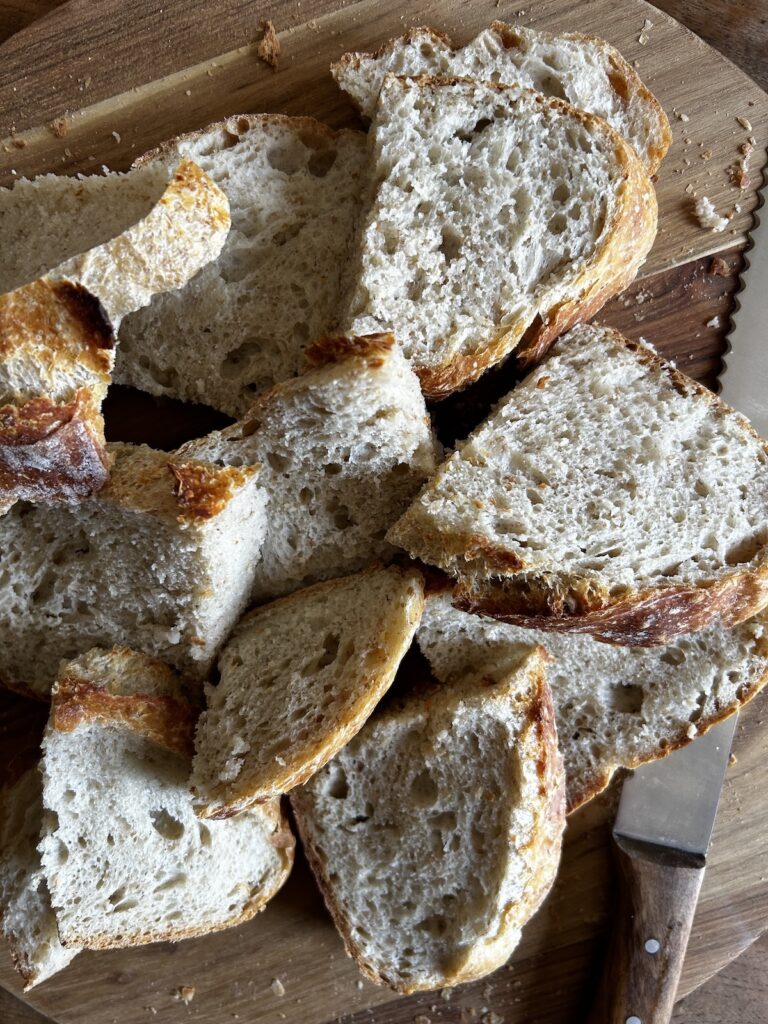
How to make No-Knead Everyday Artisan Bread in 5 steps
- Mix the dough.
- Cover and let it rise until it has doubled in size.
- Shape your dough and dust with flour.
- Cover and proof the dough in the fridge overnight or for as long as 48 hours.
- Turn dough out onto a floured surface, reshape if needed, score it and bake.
How this artisan bread recipe differs from others
Unlike most artisan bread recipes—including previous versions of my own—this recipe calls for a long cold proof.
Putting the dough in the fridge once it has completed its first rise and been shaped has been a game changer. The added step of building in an overnight cold proof makes for even better bread.
Here’s why:
The benefits of cold proofing bread dough
- Better browning.
- Improved structure due to strengthened gluten formation.
- Bubblier, softer, chewier crusts.
- A more complex, richly flavoured loaf.
- More flexibility in terms of when to bake—it makes scheduling easy!
- It makes scoring your loaf a lot easier.
You can learn more about the benefits of cold proofing no-knead artisan breads in this post Artisan Bread Basics: How Cold Proofing Changes the Game + Answers to FAQ’s.
A whole wheat loaf made with a 2:1 unbleached bread flour to whole wheat all-purpose flour blend.
the ultimate beginner loaf
If you’ve ever felt intimidated by traditional yeast baking or sourdough, this No-Knead Everyday Artisan Bread is the perfect beginner loaf to build your confidence! It requires zero complex kneading and uses simple pantry staples to achieve a professional bakery-style crust.
Baking schedule
Making this No-Knead Everyday Artisan Bread is a two-day process where the bread is mixed and prepared on day one, cold proofed in the fridge overnight, then baked on day two.
I love the convenience of this type of schedule. The dough is mixed together and set aside to rise on the first day, then left in the fridge until the next day when it can be baked in the morning, afternoon or even in the evening.
This is what it looks like:
Friday morning: Mix dough, cover and let rise.
Friday afternoon or evening: Shape dough, cover and put it in the fridge.
Saturday or Sunday morning: Remove dough from the fridge and prepare to bake.
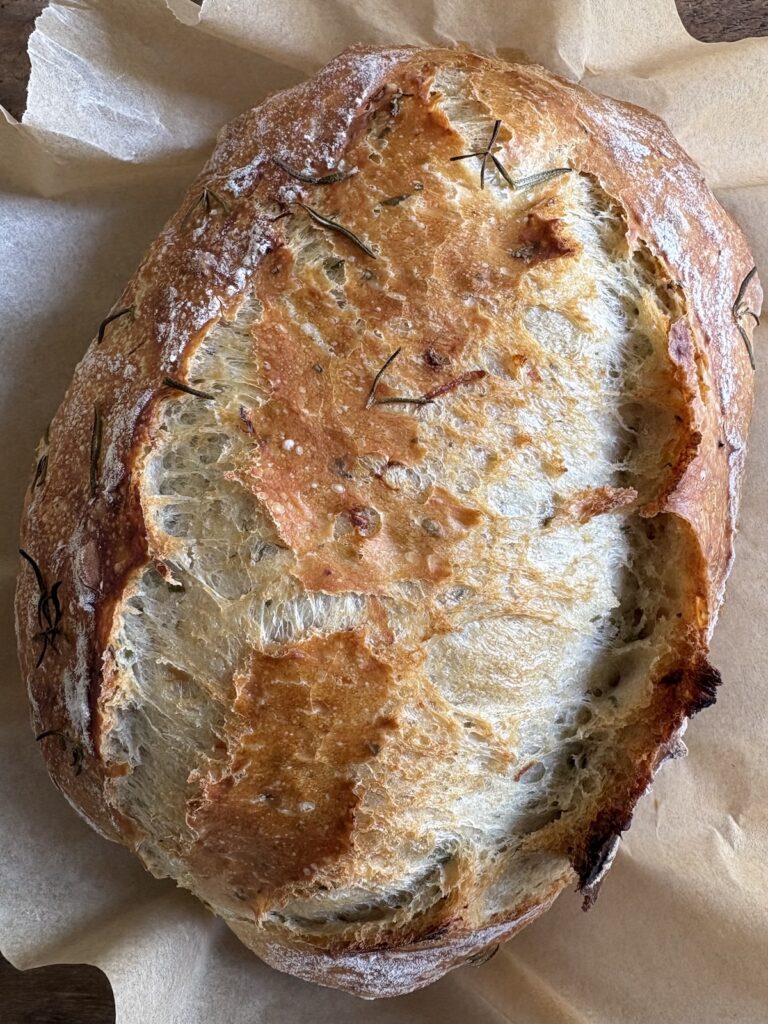
Reader favourite Rosemary & Roasted Garlic Artisan Bread.
If you’re a bread baking beginner, this No-Knead Everyday Artisan Bread as well as this Simple Focaccia Bread are the recipes I suggest making first. Another great recipe for beginners is this Rustic Irish Soda Bread with Cranberries and Raisins or these Rustic No-Knead Small Batch Ciabatta Rolls, both of which produce amazing results with very little effort.
Pair this no-knead loaf with my 5-Minute Homemade Balsamic Vinaigrette (Better Than Store-Bought) for dipping!

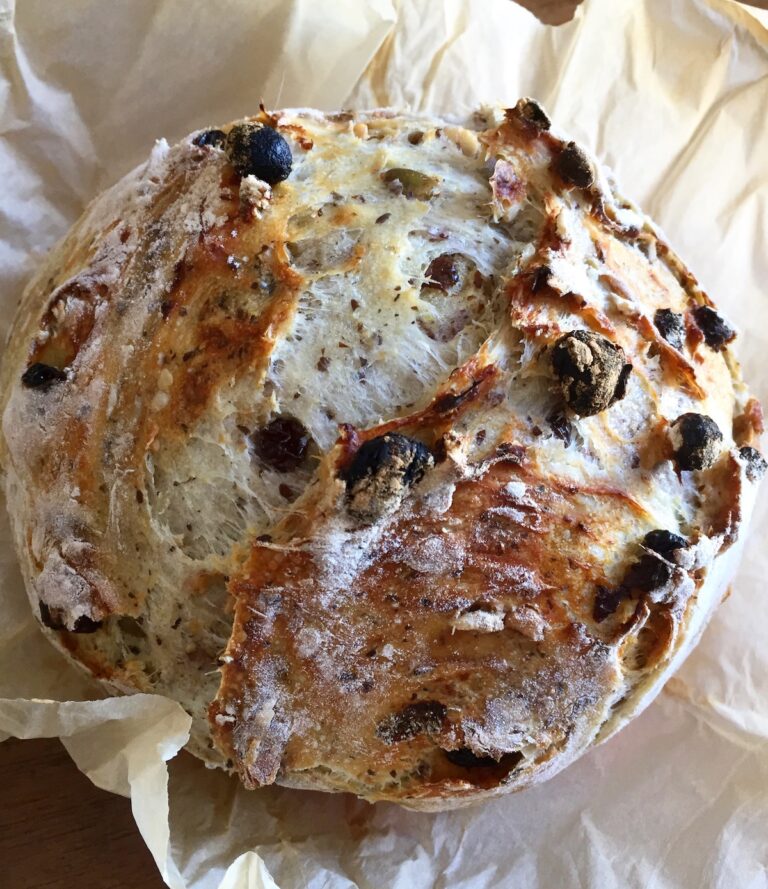
Try this No-Knead Everyday Sandwich Bread or this beginner-friendly No-Knead Green Olive and Rosemary Artisan Bread next.
For more tips and helpful information, reference my Artisan Bread Basics Series + Answers to Common FAQ’s.
Did you make this recipe?
If you tried this recipe, be sure to rate it and leave a comment below! You can also tag me with your creations on Instagram, save this recipe to your favourite Pinterest boards for later, or connect with our Facebook community if you prefer updates there.

Easy No-Knead Everyday Artisan Bread (Perfect for Beginners)
Ingredients
- 1½ cups water room temperature (at or near 70°F/21°C)
- 1 teaspoon active dry yeast
- 3 cups bread or all-purpose flour, plus more for dusting
- 1 teaspoon kosher or fine sea salt
Instructions
- Sprinkle the yeast over the water and let it sit for 10-15 minutes. In a large bowl, whisk together flour and salt and let sit for 10 minutes.
- Add water and yeast to the bowl then use a rubber spatula to mix it together just until combined. The dough will look a little sticky and stringy and there should still be a little flour around the edges of the bowl.
- Cover and let rise somewhere warm until it has doubled in size (see note below).
- Once the dough has doubled in volume, use your hands (or a dough scraper if you have one) to pull the dough out onto a floured surface. With floured hands, gently fold the dough into itself several times until a soft, flour-covered ball is formed. Place it into a flour dusted bowl, dust with flour, cover and refrigerate overnight. You can even leave it for as long as 48 hours at this point if you’re not able to bake it right away.
- When you're ready to bake your bread, preheat oven to 450ºF (232ºC) with your Dutch oven inside the oven.
- Once the oven is preheated, turn the dough out onto a lightly floured surface. If needed, gently turn it with your hands and nudge it into the shape of a loaf. Place it on a sheet of parchment paper and score the top with a razor blade or the tip of a sharp knife with a design of your choosing. This will allow steam to escape while it’s baking.
- Remove the Dutch oven from the oven and transfer the dough, still on the parchment, into the Dutch oven. Cover and bake for 30 minutes, then remove the cover and bake for 15-20 minutes more. Your bread will be done once the top is browned, and it sounds hollow when you tap the top.
- Using parchment edges, lift bread from Dutch oven and transfer it to a wire cooling rack to let cool for up to an hour before slicing.


Can I bake straight away or do I have to refrigerate it?
Hi Alexis! Yes, you can bake it once it has doubled in volume. I do highly recommend the added step of cold proofing the dough for a better result. You will achieve a better rise, richer colour and flavour, and the dough will be easier to handle for shaping and scoring, too. You can read more about the benefits of cold proofing here.
When cold proofing, can this be proofed in a banneton? And if so, do you think it would it hold its shape for scoring?
Hi Marcia! I don’t recommend using bannetons. No-knead, high hydration doughs do much better in bowls. Hope you love the recipe!
Easy and delish!
Can I make a whole grain version of this? If so, can you recommend ingredients and perportions?
Thanks!
Hi Linda! You can substitute up to 30% whole grain flour without any further adjustments. Thanks for trying the recipe and taking the time to comment!
I haven’t made this yet, my question is about the yeast, the temperature is pretty cool, does this activate the yeast this way
Yes!
I’m so excited to try this. Can you tell me if I can use Platinum Instant Sourdough Yeast instead of Active Yeast?
Thank you!
I’m not familiar with that product, but if it’s the same as instant yeast, simply mix with the flour and other dry ingredients. There’s no need to proof the yeast first.
I made the cinnamon and raisin loaf at the same time as this plain artisan loaf. Both required same amount of flour and water. I was worried about the artisan loaf dough as it wouldn’t be shaped and was very wet. I struggled even to slash it. However it turned out beautifully- well risen, round and very appetising.
I’m so pleased you enjoyed them, thank you Jeanette! K
Absolutely decadent. Tonight I’m cold-proofing a modification of this recipe: 2 cups of WW flour and 1 of regular bread one. I’m adding pumpkin and sunflower seeds too! I doubled the salt, as I like my bread a bit on the saltier side. And my son absolutely LOVES it. He’s an extremely picky eater and has enjoyed the 3 loaves I’ve made thus far. This WW one is just for me and I can’t wait to make it. Thank you so much!! I’ve tried other recipes and your instructions and attention to detail keep me coming back.
Hi Mariena! You are very welcome. I’m so pleased you enjoy them, thank you for sharing your review! K
Hi! I don’t have a Dutch oven. Any advice for baking uncovered (or using a different type of pan?)
Hi Kylie! Any kind of preheated covered baking dish will work, even a 3-Qt or larger casserole dish. Give it a try and keep me posted! K
Made this recipe with whole wheat flour, not quite as open crumb instagram aesthetic on the looks (which I expected since the bran and complex sugars of whole wheat would make it act differently), but absolutely delicious bread as an outcome, chewy crust, bouncy inside and create for eating with something soupy!
Wonderful! Thank you so much Alexandra, I really appreciate your trying the recipe and sharing your review! K
Hi Kerri-
Quick question, I just mixed the ingredients together and I would like to bake in about eight hours. I didn’t realize this recipe called for next day baking. Will the bread still be OK if I bake after an eight hour rise?
Hi Cara! Yes, as long as it has risen well it will work. Try to do a minimum 1-2-hour cold proof if you can for an even better result. Hope you love the recipe! K
Hi there! Making this for the first time tonight 🙂 if we wanted to add flavors like garlic and rosemary, would that change the recipe measurements?
Hi there! Not at all. You can also try my recipe for Rosemary & Roasted Garlic Artisan Bread, just do a quick search using the search tool! K
This is the first time I made bread and this recipe came out perfectly. However, it’s a huge loaf, so I was curious if I halved the dough to make two loaves, would I have to change the baking time? If so, by how much?
Hi Amy! I really appreciate you trying the recipe and sharing your review! To divide into two smaller loaves, I recommend reducing bake temp to 425º then bake covered for 20 minutes. Uncover and start checking for doneness after an additional 10 minutes using the tips provided in the notes. Thanks again! K
My question/comment is in the opposite direction. I have an 11 inch proofing basket that calls for a recipe that uses 7-8 cups of flour (according to the label), haven’t been able to find one yet. So can I double this recipe?
Hi Frances! Try doubling the recipe to bake two loaves. Let them proof together and then bake them separately. Thank you! K
I have been baking your artisan bread recipe and really love the simplicity of the recipe and the wonderful bread it makes. I’ve gotten hooked on making bread this way. Recently tried the cranberry, walnut adaptation and it’s wonderful too! Thank for your recipes. I hope to try some of the others at your website.
Thank you so much Pat! It makes me so happy to hear when my recipes are enjoyed, let’s keep baking together! K
THIS.IS.AMAZING. Made this, this morning baked this evening and wow what an easy yet delicious recipe. Never cold proofed a yeast bread before but it’s brilliant. Thanks so much for the recipe.
That makes me so happy to hear, thank you so much Becky! K
This recipe is easy to make and you can start it one morning, leave it for over 24 hours before you go back to it. The second rise needn’t be rushed — I baked mine hours after I shaped it!
It’s a wonderful recipe!!
Hi Florence! I’m so pleased you enjoyed it, thank you so much for sharing your review! K
I made this bread initially with all purpose flour and it turned out well — the easiest bread I have ever made! Yesterday, I mixed up a whole wheat loaf (2 cups of organic whole wheat flour and 1 cup of all purpose flour). The initial proof was 24 hours and then I proofed the loaf in a thick glass casserole for 5 or 6 hours at room temperature. I baked it uncovered at 450 and it’s the best whole wheat loaf I have ever tasted!
Thank you so much Florence! I love to hear when bakers make my bread recipes their own, don’t forget to leave a review! K
Can I use a 4qt pot or I stick w/a 3qt? Haven’t got my pot yet!
Hi Cindy! Yes, the 3-quart/3 L reference is the minimum. A 4Qt will definitely work! K
Hi- I have baked this loaf a few times now, using bread flour and following recipe as is, in a cast iron dutch oven, and very happy with the results, texture, crust, flavor and all. Only negative both times has been a particularly tough bottom crust, compared to other recipes baked in same pan. Any thoughts as to why? Hoping to keep using your recipe, along with some of your variations. Thanks.
Hi Mary! Do you have an oven thermometer? If there is a discrepancy, that will tell you whether you need to reduce oven temperature to compensate. If you don’t have one, I recommend reducing the bake time by 5 minutes. You can also try moving the Dutch oven to a higher rack in the oven if space allows, and don’t forget to heat the Dutch oven in the oven during preheating. Lastly, if your oven runs hot, you can always double up the parchment to add a little extra insulation. Keep me posted! K
Hi I am wondering if I could leave the dough for 24 hours? I don’t see a time when I’d be able to make it and get to the dough after only 8 or 10 hours. I work too much!
Hi Zaya! The baking schedule in the post is designed for just that. I think if you take another look at it you will be able to find a time that works for you. You can also always adjust the cold proof a little to accommodate your schedule if needed. Please let me know if there’s anything else I can help with! K
All I want to know is, how do you get your bread to rise so much? My artisan bread ends up only slightly thicker than a pancake.
Hi Patrick! My recipes are foolproof with plenty of tips to help you along the way. Hope you find something you like! K
Hi Kerry! How would I incorporate an active starter into this recipe for sourdough? I think it would be fantastic.
Thank you for this recipe!
Hi Anthony! Bearing in mind that the consistency of your starter can affect the texture of your dough, in most instances you can substitute ½ cup starter for the yeast then reduce water by ¼ cup and flour by ½ cup to compensate. Thank you so much for the positive feedback, happy baking! K
I’m new to making bread and haven’t had the best luck, until now. This recipe is fantastic! It’s absolutely perfect! I added a bit of honey to the water but really no need to alter this recipe at all. Thank you so much!
Thank you so much Jeff, I really appreciate you trying this recipe and sharing your review! K
Can I use 2.25 qt covered dutch oven to bake this? Or reduce recipe?
Hi Sara! There are two ways you can approach this. One option is to reduce all ingredients by 30% to accommodate a smaller vessel. A simpler alternative is to divide the dough into two smaller loaves after the first rise when you shape them, then bake them separately. You shouldn’t need to adjust bake time or temperature, but because some ovens run hotter than others, start checking for doneness at the 40-minute mark. Hope you enjoy! K
Can I reduce the salt in this recipe?
Hi April! It’s really up to you. All my bread recipes sit at about 1.5-2% salt content which is far less than most commercial varieties. Reducing or leaving out the salt entirely will produce a different result, as any modifications can impact all of colour, taste, texture and appearance. Please let me know if there’s anything else I can help with! K
Great recipe! My bread turned out perfectly!
Thank you so much Kristen! I really appreciate you making this recipe and sharing your review, so glad it was a winner! ?
Hi Kerry,
I made this bread, and added a bit of rosemary and cheddar cheese to it…came out delicious! I used instant yeast, though, and had to end up adding a bunch of flour to be able to shape the bread into a ball after that first rising. It was still quite wet. I used the 1 1/2 cups of water as the recipe called for, and wondered if that was too much liquid to use when substituting instant yeast…? Saying that, it baked up beautifully and was amazing…but if I could reduce the water a bit, that might help! Please let me know what you think! Thanks!
Hi Cathy! The rule of thumb when baking with instant yeast is to add it directly to the flour mixture, then whisk the dry ingredients together before adding the water. That should work without any additional modifications. I’m pleased you enjoyed the recipe, let me know if there’s anything else I can help with! K
hello! i was wondering if a four quart dutch oven could be used for this recipe?
Definitely!
I jumped in to ask..I only have a 7 qt dutch oven, is that ok?
Yes, that will work!
Can I just double the recipe for two loaves? Great recipe!
Hi Anthony! Yes, double everything then divide the dough after the first rise when you shape the loaves. Hope you enjoy! K